Showing posts with label Java. Show all posts

Saturday, December 28, 2024

Debugging Spark Scala/ Java components

In continuation to the earlier post regarding debugging Pyspark, here we show how to debug the Spark Scala/ Java side. Spark is a distributed processing environment and has Scala Api's for connecting from different languages like Python & Java. The high level Pyspark Architecture is shown here.

For debugging the Spark Scala/ Java components as these run within the JVM, it's easy to make use of Java Tooling Options for remote debugging from any compatible IDE such as Idea (Eclipse longer supports Scala). A few points to remember:

  • Multiple JVMs in Spark: Since Spark is a distributed application, it involves several components like the Master/ Driver, Slave/ Worker, Executor. In a real world truly distributed setting, each of the components runs in its own separate JVM on separated Physical machines. So be clear about which component you are exactly wanting to debug & set up the Tooling options accordingly targetting the specific JVM instance.

  • Two-way connectivity between IDE & JVM: At the same time there should be a two-way network connectivity between the IDE (debugger) & the running JVM instance

  • Debugging Locally: Debugging is mostly a dev stage activity & done locally. So it may be better to debug on a a Spark cluster running locally. This could be either on a Spark Spark cluster or a Spark run locally (master=local[n]/ local[*]).

Steps:

Environment: Ubuntu-20.04 having Java-8, Spark/Pyspark (ver 2.1.0), Python3.5, Idea-Intelli (ver 2024.3), Maven3.6

(I) Idea Remote JVM Debugger
In Idea > Run/ Debug Config > Edit > Remote JVM Debug.

  • Start Debugger in Listen to Remote JVM Mode
  • Enable Auto Restart

(II)(a) Debug Spark Standlone cluster
Key features of the Spark Standalone cluster are:

  • Separate JVMs for Master, Slave/ Worker, Executor
  • All could run on a single dev box, provided enough resources (Mem, CPU) are available
  • Scripts inside SPARK_HOME/sbin folder like start-master.sh, start-slave.sh (start-worker.sh), etc to start the services

In order to Debug lets say some Executor, a Spark Standalone cluster could be started off with 1 Master, 1 Worker, 1 Executor.   

    # Start Master (Check http://localhost:8080/ to get Master URL/ PORT)
    ./sbin/start-master.sh 

    # Start Slave/ Worker
    ./sbin/start-slave.sh spark://MASTER_URL:<MASTER_PORT>

    # Add Jvm tooling to extraJavaOption to spark-defaults.conf
    spark.executor.extraJavaOptions  -agentlib:jdwp=transport=dt_socket,server=n,address=localhost:5005,suspend=n

    # The value could instead be passed as a conf to SparkContext in Python script:
    from pyspark.conf import SparkConf
    confVals = SparkConf()
    confVals.set("spark.executor.extraJavaOptions","-agentlib:jdwp=transport=dt_socket,server=n,address=localhost:5005,suspend=y")
    sc = SparkContext(master="spark://localhost:7077",appName="PythonStreamingStatefulNetworkWordCount1",conf=confVals)

(II)(b) Debug locally with master="local[n]"

  • In this case a local Spark cluster is spun up via scripts like spark-shell, spark-submit, etc. located inside the bin/ folder
  • The different components Master, Worker, Executor all run within one JVM as threads, where the value n is the no of threads, (set n=2)
  • Export JAVA_TOOL_OPTIONS before in the terminal from which the Pyspark script will be run

        export JAVA_TOOL_OPTIONS="-agentlib:jdwp=transport=dt_socket,server=n,suspend=n,address=5005"

(III) Execute PySpark Python script
    python3.5 ${SPARK_HOME}/examples/src/main/python/streaming/network_wordcount.py localhost 9999

This should start off the Pyspark & connect the Executor JVM to the waiting Idea Remote debugger instance for debugging.

Wednesday, December 25, 2024

Pyspark in Eclipse with PyDev

This post captures the steps to get Spark (ver 2.1) working within Eclipse (ver 2024-06 (4.32)) using the PyDev (ver 12.1) plugin. The OS is Ubuntu-20.04 with Java-8, Python 3.x & Maven 3.6.

(I) Compile Spark code

The Spark code is downloaded & compiled from a location "SPARK_HOME".

    export SPARK_HOME="/SPARK/DOWNLOAD/LOCATION"

    cd ${SPARK_HOME}

    mvn install -DskipTests=true -Dcheckstyle.skip -o

(Issue: For a "Failed to execute goal org.scalastyle:scalastyle-maven-plugin:0.8.0:check":
Copy scalastyle-config.xml to the sub-project (next to pom.xml) having the error.

(II) Compile Pyspark
    (a) Install Pyspark dependencies

  • Install Pandoc

        sudo apt-get install pandoc

  • Install a compatible older Pypandoc (ver 1.5)

        pip3 install pypandoc==1.5

        sudo add-apt-repository ppa:deadsnakes/ppa

        sudo apt-get install python3.5
    
    (b) Build Pyspark

        cd ${SPARK_HOME}/python

        export PYSPARK_PYTHON=python3.5

        # Build - creates ${SPARK_HOME}/python/build
        python3.5 setup.py

        # Dist - creates ${SPARK_HOME}/python/dist
        python3.5 setup.py sdist

    (c) export PYTHON_PATH

    export PYTHONPATH=$PYTHONPATH:${SPARK_HOME}/python/:${SPARK_HOME}/python/lib/py4j-0.10.4-src.zip:${SPARK_HOME}/python/pyspark/shell.py;
    
(III) Run Pyspark from console
    Pyspark setup is done & stanalone examples code should run. Ensure variables ${SPARK_HOME}, ${PYSPARK_PYTHON} & ${PYTHONPATH} are all correctly exported (steps (I), (II)(b) & (II)(c) above):

    python3.5 ${SPARK_HOME} /python/build/lib/pyspark/examples/src/main/python/streaming/network_wordcount.py localhost 9999

(IV) Run Pyspark on PyDev in Eclipse

    (a) Eclipse with PyDev plugin installed:
    Set-up tested on Eclipse (ver 2024-06 (4.32.0)) and PyDev plugin (ver 12.1x).
 
    (b) Import the spark project in Eclipse
    There would be compilation errors due to missing Spark Scala classes.

    (c) Add Target jars for Spark Scala classes
    Eclipse no longer has support for Scala so the corresponding Spark Scala classes are missing. A work around is to add the Scala target jars compiled using mvn (in step (I) above) manually to: 

        spark-example > Properties > Java Build Path > Libraries
   

Eclipse Build Path Add Libraries

    (d) Add PyDev Interpreter for Python3.5
    Go to: spark-example > Properties > PyDev - Interpreter/ Grammar > Click to confure an Interpreter not listed > Open Interpreter Preferences Page > New > Choose from List:  

    & Select /usr/bin/python3.5

 Eclipse - Pydev Interpreter Python3.5

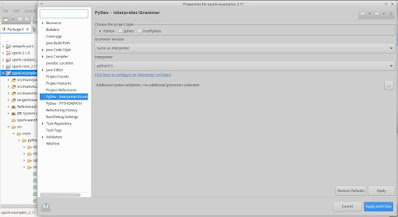
 On the same page, under the Environment tab add a variable named "PYSPARK_PYTHON" having value "python3.5"

Eclipse - Pydev Interpreter Python3.5 variable

    (e) Set up PYTHONPATH for PyDev

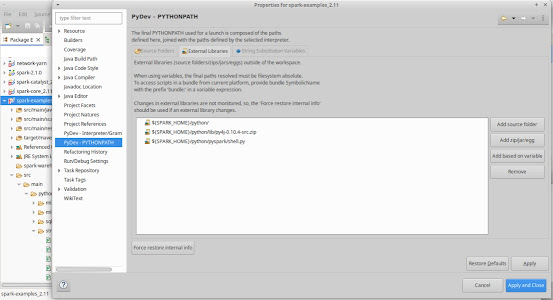
    spark-example > Properties > PyDev - PYTHONPATH

  • Under String Substitution Variables add a variable with name "SPARK_HOME" & value "/SPARK/DOWNLOAD/LOCATION" (same location added in Step (I)). 
 
Eclipse - Pydev PYTHONPATH variable

  • Under External Libraries, Choose Add based on variable, add 3 entries:

                 ${SPARK_HOME}/python/

                 ${SPARK_HOME}/python/lib/py4j-0.10.4-src.zip

                 ${SPARK_HOME}/python/lib/py4j-0.10.4-src.zip

   With that Pyspark should be properly set-up within PyDev.

    (f) Run Pyspark from Eclipse

    Right click on network_wordcount.py > Run as > Python run
    (You can further change Run Configurations > Arguments & provide program arguments, e.g. "localhost 9999")


Saturday, November 30, 2024

Scala IDE no more

Sad that Scala IDE for Eclipse is no longer supported. While it was a great to have Scala integrated within Eclipse, guess the headwinds were too strong!

Thursday, November 28, 2024

Working with Moto & Lambci Lambda Docker Images

Next up on Mock for clouds is Moto. Moto is primarily for running tests within the Python ecosystem.

Moto does offer a standalone server mode for a other langauges. General sense was that the standalone Moto server would offer the AWS services which will be accessible from the cli & non-Python SDKs. Gave Moto a shot with the same AWS services tried with Localstack.

(I) Set-up

While installing Moto ran into a couple of dependency conflicts across moto, boto3, botocore, requests, s3transfer & in turn with the installed awscli. With some effort reached a sort of dynamic equillibrium with (installed via pip):

  • awscli                       1.36.11             
  • boto3                        1.35.63             
  • botocore                   1.35.70             
  • moto                         5.0.21              
  • requests                   2.32.2                          
  • s3transfer                0.10.4  


(II) Start Moto Server

    # Start Moto
    moto_server -p3000

    # Start Moto as Docker (Sticking to this option)
    docker run --rm -p 5000:5000 --name moto motoserver/moto:latest

(III) Invoke services on Moto

    (a) S3
    # Create bucket
    aws --endpoint-url=http://localhost:5000 s3 mb s3://test-buck

    # Copy item to bucket
    aws --endpoint-url=http://localhost:5000 s3 cp a1.txt s3://test-buck

    # List bucket
    aws --endpoint-url=http://localhost:5000 s3 ls s3://test-buck

--
    (b) SQS
    # Create queue
    aws --endpoint-url=http://localhost:5000 sqs create-queue --queue-name test-q

    # List queues
    aws --endpoint-url=http://localhost:5000 sqs list-queues

    # Get queue attribute
    aws --endpoint-url=http://localhost:5000 sqs get-queue-attributes --queue-url http://localhost:5000/123456789012/test-q --attribute-names All

--
    (c) IAM
    ## Issue: Moto does a basic check of user role & gives an AccessDeniedException when calling Lambda CreateFunction operation
    ## So have to create a specific IAM role (https://github.com/getmoto/moto/issues/3944#issuecomment-845144036) in Moto for the purpose.

    aws iam --region=us-east-1 --endpoint-url=http://localhost:5000 create-role --role-name "lambda-test-role" --assume-role-policy-document "some policy" --path "/lambda-test/"

--
    (d) Lambda
    # Create Java function

    aws --endpoint-url=http://localhost:5000 lambda create-function --function-name test-j-div --zip-file fileb://original-java-basic-1.0-SNAPSHOT.jar --handler example.HandlerDivide::handleRequest --runtime java8.al2 --role arn:aws:iam::123456789012:role/lambda-test/lambda-test-role

    # List functions
    aws --endpoint-url=http://localhost:5000 lambda list-functions

    # Invoke function (Fails!)
    aws --endpoint-url=http://localhost:5000 lambda invoke --function-name test-j-div --payload '[235241,17]' outputJ.txt

    The invoke function fails with the message:
    "WARNING - Unable to parse Docker API response. Defaulting to 'host.docker.internal'
    <class 'json.decoder.JSONDecodeError'>::Expecting value: line 1 column 1 (char 0)
    error running docker: Error while fetching server API version: ('Connection aborted.', FileNotFoundError(2, 'No such file or directory'))".
    
    Retried this from AWS Java-SDK & for other nodejs & python function but nothing worked. While this remains unsolved for now, check out Lambci docker option next.

(IV) Invoke services on Lambci Lambda Docker Images:

    Moto Lambda docs also mention its dependent docker images from the lambci/lambda & mlupin/docker-lambda (for new ones). Started off with a slightly older java8.al2 docker image from lambci/lambda.

    # Download lambci/lambda:java8.al2
    docker pull lambci/lambda:java8.al2
    
    # Run lambci/lambda:java8.al2.   
    ## Ensure to run from the location which has the unzipped (unjarred) Java code
    ## Here it's run from a folder called data_dir_java which has the unzipped (unjarred) class file folders: com/, example/, META-INF/, net/ 

    docker run -e DOCKER_LAMBDA_STAY_OPEN=1 -p 9001:9001 -v "$PWD":/var/task:ro,delegated --name lambcijava8al2 lambci/lambda:java8.al2 example.HandlerDivide::handleRequest

    # Invoke Lambda
    aws --endpoint-url=http://localhost:9001 lambda invoke --function-name test-j-div --payload '[235241,17]' outputJ.txt

    This works!
 

Tuesday, November 26, 2024

AWS Lambda on Localstack using Java-SdK-v1

Continuing with Localstack, next is a closer look into the code to deploy and execute AWS Lambda code on Localstack from AWS Java-Sdk-v1. The localstack-lambda-java-sdk-v1 code uses the same structure used in localstack-aws-sdk-examples & fills in for the missing AWS Lambda bit.

The LambdaService class has 3 primary methods - listFunctions(), createFunction() & invokeFunction().  The static AWSLambda client is setup with Mock credentials and pointing to the Localstack endpoint.
 
The main() method first creates the function (createFunction()), if it does not exist.

  • It builds a CreateFunctionRequest object with the handler, runtime, role, etc specified
  • It also reads the jar file of the Java executable from the resources folder into a FunctionCode object & adds it to the CreateFunctionRequest
  • Next a call is made to the AWSLambda client createFunction() with the CreateFunctionRequest which hits the running Localstack instance (Localstack set-up explained earlier).


If all goes well, control returns to main() which invokes the listFunctions() to show details of the created Lambda function (& all others functions existing).

Finally, there is call from main() to invokeFunction() method.

  • Which invokes the recently created function with a InvokeRequest object filled with some test values as the payload.
  • The response from the invoked function is a InvokeResult object who's payload contains the results of the lambda function computation.

Comments welcome, localstack-lambda-java-sdk-v1 is available to play around!


Monday, November 25, 2024

Getting Localstack Up and Running

In continuation to the earlier post on mocks for clouds, this article does a deep dive into getting up & running with Localstack. This is a consolidation of the steps & best practices shared here, here & here. The Localstack set-up is on a Ubuntu-20.04, with Java-8x, Maven-3.8x, Docker-24.0x. 

(I) Set-up

    # Install awscli
     sudo apt-get install awscli

    # Install localstack ver 3.8
        ## Issue1: By default pip pulls in version 4.0, which gives an error:
        ## ERROR: Could not find a version that satisfies the requirement localstack-ext==4.0.0 (from localstack) 


        python3 -m pip install localstack==3.8.1

--

    # Add to /etc/hosts
    127.0.0.1    localhost.localstack.cloud
    127.0.0.1    s3.localhost.localstack.cloud

--

    # Configure AWS from cli
    aws configure
    aws configure set default.region us-east-1
    aws configure set aws_access_key_id test
    aws configure set aws_secret_access_key test

    ## Manually configure AWS
    Add to ~/.aws/config
    endpoint_url = http://localhost:4566

    ## Add mock credentials
    Add to ~/.aws/credentials
    aws_access_key_id = test
    aws_secret_access_key = test

--

    # Download docker images needed by the Lambda function
        ## Issue 2: Do this before hand, Localstack gets stuck
        ## at the download image stage unless it's already available

    ## Pull java:8.al2
    docker pull public.ecr.aws/lambda/java:8.al2

    ## Pull nodejs (required for other nodejs Lambda functions)
    docker pull public.ecr.aws/lambda/nodejs:18

    ## Check images downloaded
    docker image ls

(II) Start Localstack

    # Start locally
    localstack start

    # Start as docker (add '-d' for daemon)
       ## Issue 3: Local directory's mount should be as per sample docker-compose

    docker-compose -f docker-compose-localstack.yaml up

    # Localstack up on URL's
    http://localhost:4566
    http://localhost.localstack.cloud:4566

    # Check Localstack Health
    curl http://localhost:4566/_localstack/info
    curl http://localhost:4566/_localstack/health

(III) AWS services on Localstack from CLI

  (a) S3
    # Create bucket named "test-buck
"
    aws --endpoint-url=http://localhost:4566 s3 mb s3://test-buck

    # Copy item to bucket
    aws --endpoint-url=http://localhost:4566 s3 cp a1.txt s3://test-buck

    # List bucket
    aws --endpoint-url=http://localhost:4566 s3 ls s3://test-buck

--

  (b) Sqs
    # Create queue named "test-q"

    aws --endpoint-url=http://localhost:4566 sqs create-queue --queue-name test-q

    # List queues

    aws --endpoint-url=http://localhost:4566 sqs list-queues

    # Get queue attribute

    aws --endpoint-url=http://localhost:4566 sqs get-queue-attributes --queue-url http://sqs.us-east-1.localhost.localstack.cloud:4566/000000000000/test-q --attribute-names All

--

  (c) Lambda
    aws --endpoint-url=http://localhost:4566 lambda list-functions

    # Create Java function
    aws --endpoint-url=http://localhost:4566 lambda create-function --function-name test-j-div --zip-file fileb://original-java-basic-1.0-SNAPSHOT.jar --handler example.HandlerDivide::handleRequest --runtime java8.al2 --role arn:aws:iam::000000000000:role/lambda-test

    # List functions
    aws --endpoint-url=http://localhost:4566 lambda list-functions

    # Invoke Java function
    aws --endpoint-url=http://localhost:4566 lambda invoke --function-name test-j-div --payload '[200,9]' outputJ.txt

    # Delete function
    aws --endpoint-url=http://localhost:4566 lambda delete-function --function-name test-j-div

(IV) AWS services on Localstack from Java-SDK

    # For S3 & Sqs - localstack-aws-sdk-examples, java sdk

    # For Lambda - localstack-lambda-java-sdk-v1


Saturday, November 16, 2024

Mutable Argument Capture with Mockito

There are well known scenarios like caching, pooling, etc wherein object reuse is common. Testing these cases using a framework like Mockito could run into problems. Esp if there's a need to verify the arguments sent by the Caller of a Service, where the Service is mocked.

ArgumentCaptor (mockito) fails because it keeps references to the argument obj, which due to reuse by the caller only have the last/ latest updated value.    
The discussion here led to using Void Answer as one possible way to solve the issue. The following (junit-3+, mockito-1.8+, commons-lang-2.5) code explains the details.

1. Service: 

public class Service {

public void serve(MutableInt value) {

System.out.println("Service.serve(): "+value);

}


....


2. Caller:

public class Caller {

public void callService(Service service) {

MutableInt value = new MutableInt();

value.setValue(1);

service.serve(value);


value.setValue(2);

service.serve(value);

}

...


3.Tests:

public class MutableArgsTest extends TestCase{

List<MutableInt> multiValuesWritten;

@Mock

Service service;


/**

* Failure with ArgumentCaptor

*/

public void testMutableArgsWithArgCaptorFail() {

Caller caller = new Caller();

ArgumentCaptor<MutableInt> valueCaptor

ArgumentCaptor.forClass(MutableInt.class);


caller.callService(service);

verify(service,times(2)).serve(valueCaptor.capture());

// AssertionFailedError: expected:<[1, 2]> but was:<[2, 2]>"

assertEquals(Arrays.asList(new MutableInt(1), 

new MutableInt(2)),valueCaptor.getAllValues());

}


        /**

* Success with Answer

*/

public void testMutableArgsWithDoAnswer() {

Caller caller = new Caller();

doAnswer(new CaptureArgumentsWrittenAsMutableInt<Void>()).

when(service).serve(any(MutableInt.class));

caller.callService(service);

verify(service,times(2)).serve(any(MutableInt.class));


// Works!

assertEquals(new MutableInt(1),multiValuesWritten.get(0));

assertEquals(new MutableInt(2),multiValuesWritten.get(1));

}

/**

* Captures Arguments to the Service.serve() method:

* - Multiple calls to serve() happen from the same caller

* - Along with reuse of MutableInt argument objects by the caller

* - Argument value is copied to a new MutableInt object & that's captured

* @param <Void>

*/


public class CaptureArgumentsWrittenAsMutableInt<Void> implements Answer<Void>{

public Void answer(InvocationOnMock invocation) {

Object[] args = invocation.getArguments();

multiValuesWritten.add(new MutableInt(args[0].toString()));

return null ;

}

}

}

Monday, August 19, 2024

Pygradle for Python-3

Gradle, the build workhorse from the Java ecosystem, extends its support to Python through Pygradle. A recent attempt to build a Python-3.x project using Pygradle though did't work as expected. 

The delta between the supported Python-2.x vs Python-3.x is hard to reconcile with many issues like:

  • Need for a specific, old version of Java (ver.8), Gradle (ver. 5.0), etc
  • Dependencies on old versions of Python modules without backwards compatibility
    • Hard to figure out which exact version will work
    • A rule of thumb is to pick the highest version dependency module around some cut-off year like 2018/19, post which they don't seem to build
  • Downloading of the correct dependencies & creating ivy files
    • Includes identifying the right version, name, dependencies-within-dependencies (that no longer work on Python-3.x), etc.
  • Using a local file system based repo to download & build modules & ivy files

With some effort though, have been able to complete a successful build on a Python-3.8 on an Ubuntu-20.04 with Java-8 & Gradle-5.0. More details are available on the pygradle_python3_example repo. Hope this helps!

Monday, August 12, 2024

To Mock a Cloud

Cloud hosting has been the norm for a while now. Saas, Paas, Iaas, serverless, AI whatever the form may be, organizations (org) need to have a digital presence on the cloud. 

Cloud vendors offer hundreds of features and services such as 24x7 availability, fail-safe, load-balanced, auto-scaling, disaster resilient distributed, edge-compute, AI/ Ml clusters, LLMs, Search, Database, Datawarehouses among many others right off-the-shelf. They additionally provide a pay-as-you-go model only for the services being used. Essentially everything that any org could ask for today & in the future!

But it's not all rosy. The cloud bill (even though pay-as-you-go) does burn a hole in the pockets. While expenses for the live production (prod) environment is necessary, costs for the other dev, test, etc, internal environments could be largely reduced by replacing the real Cloud with a Mock Cloud. This would additionally, speed up dev and deployment times and make bug fixes and devops much quicker & streamlined.

As dev's know mocks, emulators, etc are only as good as their implementation - how true they are to the real thing. It's a pain to find new/ unknown bugs on the prod only because it's an env very different from dev/ test. Which dev worth his weight in salt (or gold!) hasn't seen this ever?

While using containers to mock up cloud services was the traditional way of doing it, a couple of recent initiatives like Localstack, Moto, etc seem promising. Though AWS focussed for now, support for others are likely soon. Various AWS services like s3, sns, sqs, ses, lambda, etc are already supported at different levels of maturity. So go explore mocks for cloud & happy coding!

Wednesday, January 23, 2013

Headless Java Monster

You know you are up against the same fellow if you start seeing the
java.awt.HeadlessException, typically running off a virtual server, or in the rare  case of a dedicated server without a monitor (aka head).

The solution is simple. First shut down the application, tomcat, etc. that got the exception.

1. Install the X display manager. 


On a Ubuntu on the other hand, you could install the Xvfb package (via apt, synaptic, etc.)

2. Start X:

3. Export display:
With those done, now you should have entered the simpler "No X11 DISPLAY variable" zone. Simply export the display variable to fix this.


(In the Ubuntu case above you have to export DISPLAY=:1)


4. Allow all users to connect/ use this Display variable:


Now restart the application, tomcat, etc. that you were trying to run initially & it should work. Hope nothing headless ever troubles no man!

Tuesday, November 20, 2012

C# - A home away from home

For someone with years of experience in Java, the stint to code in C# seemed like a cake walk. The large scale port of popular Java frameworks into dot net such as NHibernate, Spring.net, NUnit, etc., make life all that much easier for anyone starting to bridge the gap.

There are however some bits that trouble us Java natives no end. Particularly anything & everything to with the web.config file. This one file has enough traps in it to confuse the hell out of any sane minded developer. The file has hints for the IDE (Visual studio), the framework (Asp.net), the web server (IIS), & everyone else connected to the runtime.

The other bit that seems bothersome is how dependencies, packages & Dll's get referenced. Particularly with frequently changing Dll's, & the tools optimized for caching, it gets difficult to know what version is really loaded & running.

Anyway, once you get past these issues, the ride ahead is through familiar grounds.

Wednesday, September 12, 2012

Remotely Debug Solr Cloud in Eclipse Using JPDA, JDWP, JVMTI & JDI


The acronym's first:
JPDA - Java Platform Debug Architecture
JDWP - Java Debug Wire Protocol
JVMTI - JVM Tool Interface
JDI - Java Debug Interface

To debug any of the open source Java projects such as Solr using Eclipse, rely on the JDWP feature available within any standard JVM. You can get a lot more info about the terms and architecture here.

At a high level the concept is that there is a JVM to be debugged (Solr) & a client side JVM debuggee (Eclipse). The two communicate over the JDWP. Thanks to a standardized wire protocol the client may even be a non JVM application which subscribes to the protocol.

One of the two JVMs acts as the debugging server (the one that waits for the client to connect). The other JVM acts as the debugging client which connects to the debugger server, to start the debugging process.

In our case, to keep things simple let Solr be the debugger server, while Eclipse can be the debugger client. The configurations then are as follows.

On Solr side (assuming Solr Cloud):

java -Xdebug -Xrunjdwp:transport=dt_socket,server=y,suspend=y,address=8000 -Djetty.port=7200 -Dhost=myhost -Dbootstrap_confdir=./solr/collection1/conf -Dcollection.configName=myconf -Djava.util.logging.config.file=etc/logging.properties -DnumShards=3 -DzkHost=zk1:2171 -jar start.jar

Note: Since we have set suspend = y, Solr side will stay suspended until the Eclipse debugger client has connected

On Eclipse side:
Go to Run > Debug Configurations > Remote Java Application
Then choose Standard Socket Attach. Host: localhost (or IP). Port: 8000 (the same as set above)

Also in Eclipse you should have checked out the Solr source code from Solr trunk as a project. This will allow you to put break points at appropriate location to help with the debugging. So go on give this a shot and happy debugging!

Sunday, May 20, 2012

Java Classloaders


Key things about Java classloaders:
1. There is a hierarchy among classloaders:
Bootstrap <---|
                      Extension <--|
                                          System <---|
Custom

- Child classloaders (typically) delegate class loading to parent classloaders. child class loader’s findClass() method is not called if the parent classloader can load the class.
- Custom classloaders can override the default delegation chain to a certain extent.
- Due to the delegation chain of classloaders, ensure classes to be loaded by custom classloaders are not present on the system class path, boot class path, or extension class path.

2. Bootstrap classloader is a special classloader included with the JVM, written in native code. Bootstrap classloader is tasked with loading all core classes part of the jre.
None of the other classloaders can override the Bootstrap classloader's behvaiour.

3. All other classloaders are written in Java.

4. Extension classloader loads classes from the extension directories: JAVA_HOME/jre/lib/ext/

5. A more popular alternative to using the Extension classloader, is to use the System classloader which loads classes from the CLASSPATH environment variable location.

6. Finally, Custom classloaders can be written to override certain defaults like delegating classloading to parents, etc. Custom classloaders is commonly used by Application servers (such as Tomcat).

7. Separate Namespaces per Classloader:
Same class loaded by two different classloaders, are considered different. Trying to cast an object of one class (loaded by classloader 1) to a reference of the other (loaded by classloader 2, though identical in terms of its fully qualified class name) will result in a ClassCastException.

8. Lazy loading and Caching of Classes:
Classloaders load classes lazily. Once loaded classloaders cache all previously loaded classes for the duration of the JVM.

Key Methods of Classloaders:
To be detailed..

Dynamic Reloading of Classes:
Due to the non-overridable behaviour of caching of classes by classloaders, reloading of classes within a running JVM poses problems. To reload a class dynamically (a common use case for app. servers), a new instance of the classloader itself needs to be created.
Once the earlier classsloader is orphaned/ garbage, classes loaded & cached by it (and reachable only via the now GC'd classloader) also become garbage, which can then be collected by the GC.

Sunday, February 26, 2012

Phantom References in Java

Depending upon the tenacity of the grasp of the reference object, Java language has defined four different kinds of reference types - Strong, Soft, Weak & Phantom.

A simple search leads you to good explanations on the topic. Particularly the article by Ethan, this SO discussionthe official Java docs from Oracle, and this article on reachability are useful.

The focus of this article is to explain the working of the example in KDGregory's post on Phantom References.

You must understand the call sequence shown above and the purpose of the participating classes. The key points are:

(i) PooledConnection: class extends Connection class.

(ii) Client Applications: only interact with instances of  the wrapper PooledConnection class. Applications get hold of new connections via the getConnection() for the ConnectionPool.

(iii) ConnectionPool: has a fixed number of Connections (base).

(iv) IdentityHashMap: Strong references to currently assigned/ in use Connections are maintained in two IdentityHashMaps - ref2Cxt & cxt2Ref. The references in the two HashMaps is the PhantomReference to the newly created PooledConnection.

The code is able to handle the following cases with regard to releasing of connections:

Case 1: A well behaving client, which calls PooledConnection.close():
This in turn calls the ConnectionPool.releaseConnection(Connection), passing in the associated the Connection object, leading to returning of the associated Connection object to the Connection Pool.

Case 2: Misbehaving client, Crashed client, etc. which does NOT call PooledConnection.close():
Once the client application stops using the PooledConnection object, the PooledConnection object goes out of scope. At this stage the PhantomReference associated with the PooledConnection object (see wrappedConnection()), gets enqueued in the associated ReferenceQueue.

In the ConnectionPool.getConnection() method, the call to ReferenceQueue.remove(), returns the PhantomReference to the particular  PooledConnection. Passing in this PhantomReference to ConnectionPool.releaseConnection(Reference), locates the associated Connection object from the _ref2Cxt, IdentityHashMap, & returns the Connection back to the Connection Pool.

This automatic reclaiming of the precious (yet orphaned) Connection is the crux of KD Gregory's Phantom Reference example.

Sunday, January 22, 2012

Java Generics PECS & Get-Put Principle, Non-Reifiable Types & Erasure, Covariance & Contravariance


Joshua Bloch's in the book Effective Java has introduced the PECS (Producer Extends Consumer Super) mnemonic for managing type hierarchies via Java Generics, i.e. Covariance & Contravariance for Generics.

Covariance & Contravariance

Covariance is a subtyping principle where a child/ sub-type can be used in place of parent/ super-type. In Java land this is seen with Arrays, Method Overriding (Java 5 onwards) & Generics Extends.

Contravariance is the reverse, where a parent/ super-type can be used in place of a sub-type. In Java, contravariance is seen with Generics Super.

PECS

Now coming back to PECS, also referred to as the Get-Put, principle of Generics. The key thing about PECS is that it is defined from the persepective of the Collection object in focus, and not the caller/ client using the Collection object.

Case 1: When the Collection is being used to retrieve existing (previously added) data, from the Collection's perspective it is a Producer of data. As per PECS it needs to Extend.
The caller in this case can be sure that results have objects who's parent is MyParent. So the caller can safely iterate over results as an immutable collection of MyParent objects.

However, any kind of addition into the Collection <? extends MyParent> is unsafe. MyParent can have any number of subtypes (MyChild1, MyChild2, etc.) and there is no way for the caller application to know this specific subtype. So at this stage any addition is not allowed.

Case 2: When the Collection is being used to store new data, from the Collection's perspective it is a Consumer of data. As per PECS it needs to define Super.

Type Erasure & Non-Reifiable Nature of Generics

Java Generics is implemented through erasure entirely at the compiler level. The type info. is discarded from within the bytecodes (i.e. List<String> & List have identical bytecodes). This also causes the non-reifiable behaviour of Generic types, i.e. the inability to determine the type info. from the bytecode at runtime. (Note that Arrays are reifiable as shown in E.g. 2 above).

The PECS rule is therefore to make the compiler operate defensively.  Once type info has been associated with a given Collection via Generics, the PECS restriction is there to enable compile time detection of potential unsafe usage.